We have recently been getting a lot of emails from readers asking about how they can improve their self-esteem – a lot of wives just aren’t feeling attractive! Yikes! I have found that in order to feel beautiful and actually believe the sweet compliments my husband sends my way, I have to actually BELIEVE I am attractive myself!! I feel SO much more beautiful when I wear make-up! I know make-up isn’t for everyone but it’s crazy what a little of that can do to my confidence!! I am definitely a “make-up” fan and knowing how to apply make-up that brings out my best features… makes me feel extremely confident for our Date Nights! 🙂

Disclaimer: This post contains affiliate links. To learn more about ’em, click here.
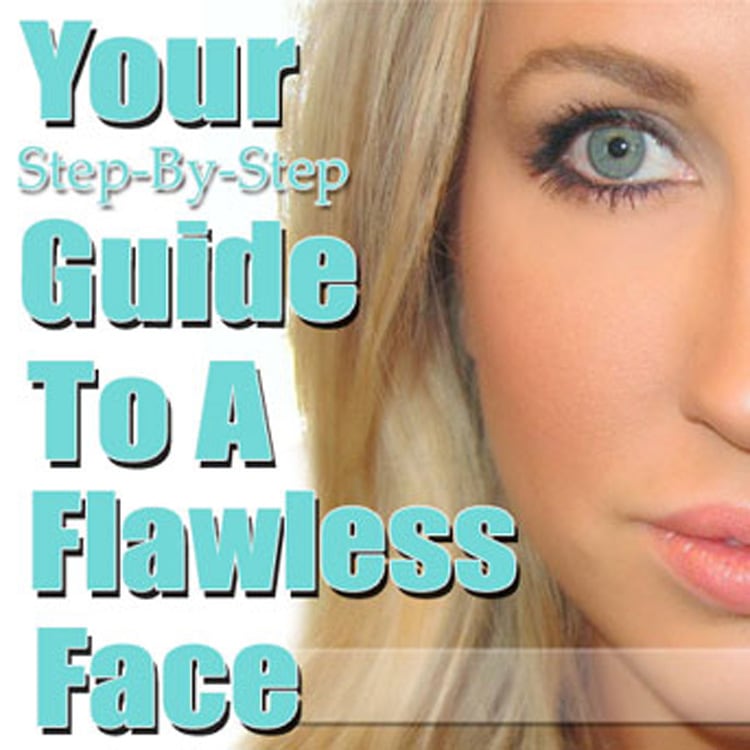
Enter… the Make-Up Guru!!

So, I have this friend named Alyssa who I have know since Middle School. She was a cheerleader and had both the personality {very peppy with an infectious personality} AND the looks to go along with it! She is probably laughing at the fact that I am calling her the “make-up guru”… but you will DEFINITELY agree with me after reading this post! 🙂 I asked her if she would be willing to spill her secrets… from start to finish… and I am sooooo excited that my GORGEOUS friend agreed to share ALL of her tips when it comes to looking AH-MAZ-ING! Here she is!!
* * * * * * * * *

When Dating Diva, Tara, approached me about writing up my beauty regime, I was flattered but surprised. I have no professional experience with makeup, although I’ve been an amateur since I was 16! Over the years I have frequently changed my approach due to new products, trends (both wonderful and awful) and my maturing face. It helped that I married into a family that ran a modeling agency for years, and I learned quite a bit in a relatively short amount of time. I enjoy feeling as attractive as I can, both for myself, and for a husband that has been around waaaay too many beautiful women in his lifetime!
The following is my daily routine. This is what I know. Hopefully you can relate to something in here, or pickup a new way of doing something. I’m a big believer in learning as much as you can and experimenting, until you discover the perfect combination(s) that works for you!
STARTING OUT

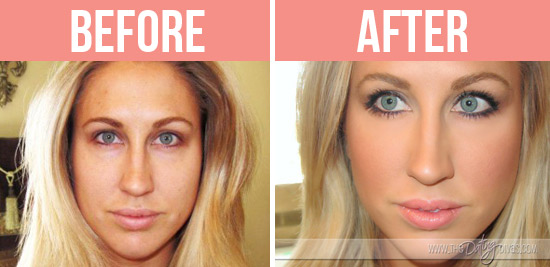
Yikes! Is that me?? I had to take a few deep breaths before posting this. I challenge you to scrutinize yourself as you are, sans makeup. Grab a mirror, take stock of your features and learn what you really want to emphasize. Ok, take it easy – everyone has different features they love and pain points. This is your playground, and it’s what gives you your unique beauty, so learn to love it!
Okay, so now we love our faces. Awesome. Still…maybe we have a few little areas we would rather detract from than draw attention to. Or perhaps we have the desire to balance the asymmetries of our faces (we are ALL asymmetrical ladies – get over it!). It’s possible that if the coloring/contouring changed just SO, we would feel a lot more va-va-voom. And there’s always the chance that you’re like me and, on top of everything else, you find change FUN. With an understanding of how makeup works and a healthy adventurous spirit, makeup can become your best friend.
Over many years I have learned this about myself: I feel better tan. I feel better with makeup. It is what it is. Each person will have a different goal or vision when pulling out their magic mascara wand, but when applying my own makeup, I concentrate on the following: even out my skin tone, balance my weaker right side with my stronger left side, play up my eyes and make them look wider apart, create cheekbones and look as youthful as possible. This last concern requires a very delicate balance. When searching for the fountain of youth, it’s way too easy to create the opposite effect.
BASE
The foundation of good makeup is a clean, moisturized face. My skin tends to be on the drier side, and ever since my third 28th birthday I’ve been more intrigued with the dark arts of anti-aging. I like to use StriVectin –SD cream morning and night. This formula was originally developed to reduce stretch marks, but was discovered to minimize wrinkles as a side effect. It’s expensive, but good deals can be found at Costco. Another great line of products of moisturizers and eye creams is Oil of Olay ProX, which I occasionally rotate in.

As I mentioned before, I like being tan. However, unlike my olive-skinned mother, I’m pretty fair and my face won’t hold a spray tan beyond 48 hours. Two comments here: 1. If you are using UV to tan your face – STOP. It’s bad. You will look old. Maybe not today, maybe not tomorrow, but sooner than you think. If you MUST use a tanning bad, cover your face and neck with a towel. Wear sunscreen on your face, neck, hands. 2. Spray and bottle tans are NOT what they used to be. There are some fantastic products out there, and with the anti-solar movement, they are getting better all the time. Befriend one. My favorite right now is GlowFusion by FusionBeauty which I try to spray on my face and décolletage every 2-3 days. I’m not as consistent as I’d like to be, but I always do it leading up to big occasions. I just heard about another one from Clarins that is supposed to be incredible, but I haven’t tried it yet myself. The one drawback to spray tanning my face is that it darkens uneven skin spots. Not a big deal, I just need a bit more concealer.

My current favorite is the High Definition Concealer by Smashbox, which comes in a tube. It’s not cakey and is easy to apply. I use my fingers to dab it along the dark areas under my eyes and on any blemishes or dark spots. When going under my eyes, I try to keep the concealer contained to the dark areas and blend in. When I was younger, I put it all under my eyes, but quickly found that too much concealer in the wrong spots was worse than none at all.

I follow up with BareEssentials concealer brush and foundation powder (will describe more later). I “push” on additional coverage where needed.

TIP: Whether fair or dark, the color of your face should match the color of your body. That’s not always easy to do, and if you know there is an imbalance, pick your makeup colors accordingly.
CONTOURING
Contouring is the most powerful thing makeup can do for you. It can bring out your best features, hollow your cheeks, raise your browbone. It’s magic. Follow this simple rule: anything you want to bring forward, highlight. Anything you want to recede, darken.
I recently changed my approach to contouring, after reading a few pages from Scott Barnes’ “About Face.” He suggests doing any contouring BEFORE your foundation, and I’ve found it to have a more subtle effect. However, I use BareEssentials minerals as my foundation, which is a powder, not a liquid foundation. I don’t know how it would work under a liquid, so you might want to do your contouring afterwards in that case.
Darkening: Take a blush brush and your favorite bronzing powder (mine is BareMinerals in Warm) and apply in an “E” along each side of your face. The top of the E is the along the temple hollow, the middle is below your cheekbone, and the bottom is just under your jawbone. Because I have “thyroid” neck (my mother always thought I had a thyroid problem due to my puffy neck…nice…), I also extend the contouring down my throat. If I will be showing ANY skin I also contour my collar bone and décolletage. You don’t want your makeup to suddenly stop at your jawline. Finally, I take a small brush and contour along the side of my nose.

TIP: This entire process should be customized to what you want to accomplish. To make a long face look more oval, use contouring at the top of the forehead and bottom of the chin. To make a round face have more definition, use the E technique outlined above. To find the middle of the E, suck in cheeks and follow that natural line back towards your ear to see where you should apply. Don’t bring the contouring too far forward or your cheeks can look dirty. Blend, blend, blend.
Highlighting: Your highlight can be either a light powder or foundation, or a soft shimmer. I said shimmer, ladies! NOT SPARKLE. NOT GLITTER. This is one thing that can emphasize age and wrinkles very quickly and scream “I’m trying too hard.” Avoid stark white, which can be harsh and chalky – aim for a very light shade of your own skin tone.

The shimmer in the photos is actually a Sephora eyeshadow that I don’t love, but does the trick. Take a small brush and apply your highlight in a sideways V around the outside of each eye. The top is above the eyebrow, the apex close to the temple, and the lower angle along the top of the cheekbone, right under the eye socket. Next, to open your eye, sweep a bit directly under your brow, right on the bone. I also occasionally put a small bit down the bridge of my nose and along my jawbone. Turn your head in the light, and you should see where the light is catching your face. Make any needed adjustments depending on your face shape.

FOUNDATION
When I lived in a cooler climate, I was all about full-coverage, matte makeup. MAC was my favorite foundation because it covered all and looked very polished. However, I moved to Arizona about five years ago and could no longer handle the feel of heavy foundation melting off my face. Yuk. I picked up a sample kit of BareEssentials powder foundation and fell in love. I own several shades from fair to tan that I can easily mix and match depending on my skin tone and time of year. It gives a soft, dewy look with surprisingly great coverage, and it doesn’t feel like makeup. I’m sure other mineral makeup works just as well, but I don’t have experience with them.
Pick or mix a shade that most closely matches your skin tone and swirl, tap, buff away. This will blend together the contouring you did previously. Blend up into the hairline and around all edges of your face. Once again, don’t neglect your neck or décolletage.

If you use a liquid foundation, I recommend investing in a brush to “push” the foundation into your skin and pores. This technique gives better, more natural coverage with less product.
TIP: If your body is significantly darker or lighter than your face, adjust the foundation color accordingly.
BLUSH
This part is easy. Grab your blush brush, blush, grin and sweep/swirl onto the apples of your cheeks (the chipmunk part).

TIP: pick a blush color that’s close to your natural flushed look. A favorite of Allure magazine and myself, is the color Orgasm by Nars. Quit giggling and try it out – it’s a beautiful apricoty-pink that seems to look good on most skin tones. Glee by BareEssentials, gives a beautiful flushed glow.
BROWS
Brows are essential! I’ve seen drastic makeovers where the most dramatic improvement was a quality brow shaping. If you aren’t comfortable doing this on your own, go see a professional and get some tips. Remember – it’s better to under-pluck than over-pluck! Don’t expect them to be perfectly symmetrical. As Darla, the amazing esthetician, once told me “They’re sisters, not twins.”
Comb your brows to enhance their shape.

It’s time to fill in your brows with either a powder and small brush or a pencil. My favorite is the red brow pencil by Maybelline in Blonde. Make sure it’s sharp and use quick strokes to draw in little hairs. You can perfect any missing spots or scars, and strengthen the desired shape. My brows are temperamental: sparser, but long. In order to keep them from going haywire I have to trim them down a bit. I use the pencil to give the illusion of fullness. I also will extend them a bit longer if they are weak at the ends.

EYESHADOW
Now you have the perfect arches, let’s make your eyes pop! Once again, I follow the simple rules of contouring here. I use a flat eyeshadow brush to apply a light shade of shadow (all the shadows in this demo come from NARS) over the shimmer on my brow bone and also pat it into the inner corner of the lid.

Next, I use a neutral shade and an angled brow brush. I sweep it along the outer two thirds of my lid, and then in the crease to create a shadow in the outer third of my eye. At an angle, I blend the neutral color up towards my outer brow. Remember, one of my goals is to create the illusion of farther-set eyes. Therefore, everything I do is intended to draw attention out and up. Sweep some more under the outer half of the lower lash line.

Finally, I take my darkest shade and the pointy end of my flat eyeshadow brush (this one is from Bare Essentials, but this one would work great too!). I swirl the darkest shade into the corner of the eye and the deepest part of the crease, blending it into the neutral color. I also extend this color a bit under my lashline.

I won’t go into color recommendations for eyes, because it’s just too personal and difficult to generalize. Play around, ask for feedback, and use what you feel best in. Much more important than the colors you choose is your ability to blend, blend blend!
TIP: If you have trouble keeping your eye makeup on throughout the day, try putting on a bit of concealer as a base. I’ve tried expensive eye primers that many people swear by, but haven’t noticed a big difference.
EYELINER
With my light eyes and hair, my eyelashes/lids tend to disappear. Therefore, I’m a fan of eyeliner. Without it, a lot of people don’t think I wear much makeup at all (haha).
I use a kohl black (this one is from MAC) to line my upper lid. I use very short strokes to stipple it into the lashes themselves and extend it slightly past the edge of my outer lid. I’m not quite going for a cat eye, but I am, as always, directing attention outwards.

Using the smudge edge of my favorite eyeliner pencil (Maybelline midnight blue), I soften the entire line.

Finally, I use that same blue to do my lower lid line. I apply just under the lashes, once again stippling it upwards into the lower lash line. I smudge this line as well.

MASCARA
I’m going to pause here and point out the obvious. I LOVE Maybelline eye makeup. I have tried many an expensive eyeliner, brow pencil and mascara. At the world’s recommendation, I bought DiorShow mascara, yet I didn’t see any improvement over what I was currently using. I feel incredibly lucky that my favorite eye makeup is so DANG CHEAP. It’s the one part of my makeup that doesn’t require a small loan to stock up on. I love quite a few Maybelline mascaras. Most people swear by Great Lash (pink & green tube) but that one isn’t for me. Right now I love VolumExpress, but I will try anything by them. Fabulous and cheap!
Prior to applying mascara, do yourself a favor and curl your lashes! Mine are naturally stick straight, which is a pain, but curling at the base for about 10 seconds each side makes a pretty big difference. I’ve read many places that you’re supposed to start at the base and slowly work your way up, but that always gives me a funky, crimped look, so I don’t.

When applying mascara itself, place the wand at the base of your lashes and slightly shake back and forth as you pull up. This will give better coverage around the entire lash and make them look fuller. The one here is MAC, but this one works great too. I apply a few coats, but I don’t allow them to dry in between, which can make them clumpy. Don’t forget your lower lashes!

When your eye makeup is done, take a clean blush brush and dust off any particles that have fallen on your face. If it’s mascara, however, let it dry first to avoid a big black streak. Some people will do their eyes first to avoid this issue.
LIPS
Almost done! Phew! I usually splash on some lip gloss and go. However, if you are aiming for a seriously sexy pout, there are some special tricks you can do.
There’s a special lip pencil that Cargo makes that is a light shade intended for, you guessed it, highlighting. The rim around the outside of your lips starts out full when you are young, and slowly deflates as you age. The continue the illusion of a full, plump lip, use the highlighter along the rim, just above the colored part of your lip. You can also highlight the two ridges in the middle of your lip. Blend well, you don’t want to look like you just ate a powdered donut.

Next, put on your favorite lipstick (I’m not a lipliner fan as it tends to wear off last). Finally, dab a bit of lip gloss in the middle of your lips, to enhance the middle. Smashbox has some beautiful colors.

ALL DONE

Voila! I’ve shown you all the smoke and mirrors I use to get ready for a fun day or evening out. Hopefully there was something of use in here for you, or at least a bit of inspiration. I’m sure my routine will be slightly modified by the time you finish reading this – there is way too much to play with out there!
WHERE TO BUY
My favorite places to shop for makeup are Ulta and Sephora. I’m all about convenience, and I can get makeup, hair and skin products in one stop. ULTA carries my drugstore favorites as well as many of my favorite higher end lines (NARS, Smashbox, Two-Faced, BareEssentials). Two stores, Sephora and Rite-Aid, stand out for their return policy – which is important when trying out new products and colors. It’s easy to make a mistake, and they both do no-hassle open-box makeup returns.
MAC makeup has beautiful eyeshadow pigments, great false lashes and good full coverage concealers and foundations. You can also schedule to have your makeup done for free at MAC, if you’re willing to invest in $50 of product.
DAYTIME VS NIGHTTIME
I don’t vary my makeup greatly between day and night. This is the way I feel good, regardless of the time of day. So, unless I’m going really dramatic with a smoky eye, I just deepen it a bit for the evening/night. Here are some options for those that prefer a more pronounced difference.
|
DAYTIME (PRETTY) |
NIGHTTIME (PRETTY SEXY) |
| Contouring just under foundation/base | Additional bronzer on top |
| Lower eyeliner to only the first third of the eye | Lower eyeliner across the lashline, and on the waterline (wet lip of lower lid) as well |
| Neutral colored eyeshadow in the crease | Layer an additional dark color (I will go as dark as black) of eyeshadow, concentrating on the outer V corner – blend blend blend! |
| Light colored foundation, powder, eyeshadow as your highlight color during contouring | Shimmer to contour. Optionally can pack a bit of shimmer into the inner corner of eyelid next to the nose |
| Lipgloss | Lipstick and/or gloss |
* * * * * * * * *
Wow, huh! I don’t know about you but as soon as she sent this to me, I compiled a list of new make-up products to try and went a-shopping! I can’t WAIT to try all of her tips! ….and I REALLY can’t wait until Date Night this weekend! 🙂 If some of this make-up seems a little too pricey for you to purchase right now, go check out these e.l.f products! They always have fabulous deals going on for killer prices! 🙂 Be SURE to set some time aside for yourself this week to play around with make-up!! 🙂


Yikes! Is that you without makeup??
I don’t mean to go against anything you wrote here, but you KNOW You are beautiful without all that meakeup. It saddens me to think that everyday more and more women are striving to be “perfect” on the outside when they are already as perfect as they can be! It’s nice to put on makeup, but not when you think your bare natural face is something to be ashamed of.
I totally appreciate what you’re saying and your kind words! A lot of us here at the Divas definitely love going sans makeup but enjoy the fun of being able to get made up, especially on date night! {Wink} Thank you again for sharing your very lovely thoughts because they are so true! XO