I am so excited, I usually guest post on other craft blogs, and this time it is different! I love to have a new audience. Since it’s my first time here, bare with me;-)
My name is Sibylle and my blog is called Funkytime. I am a graphic designer/ blogger/ regular German girl with a passion for (Food-) Photography, DIY projects, decorating & pretty Vintage things …

When I am not blogging, painting something white or photographing food, I spend my time with my hubby, Mr.T, and our two kids, Louisa & Noah. We usually travel the world, spending a couple of years here and there and then somewhere.

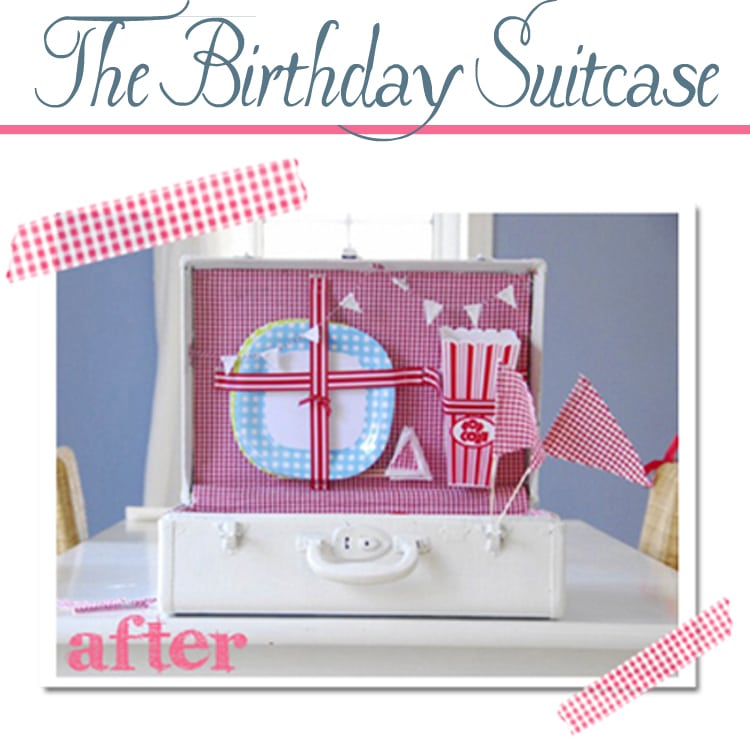
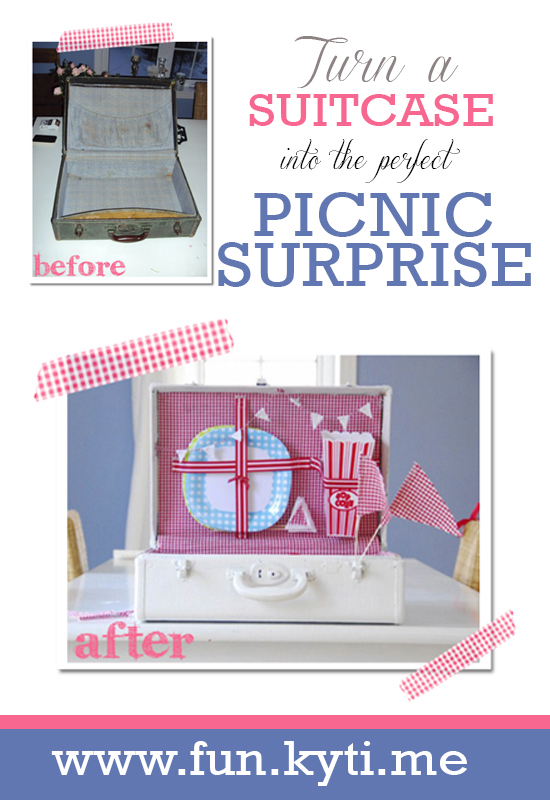
Today I want to share with you the present I made for Mr. T’s for his birthday earlier this year. He always wanted a picnic basket, so we could have a little romantic picnic somewhere out in the country side. But all the picnic baskets I saw looked the same and didn’t really appeal to me. A couple of weeks earlier, I bought an old vintage suitcase for $15 at the flea market, which turned out to be the ideal piece for my picnic basket idea.

It was dusty, smelly and had to go a long way to become what it is today!

One evening before his birthday, Mr.T went out to see a friend. I had approx. 4 hours to do my magic! It was tight, but it all worked out fine!

You will need:
- Time: 4 hours
- Cost: $55 ($15 for the suitcase and $40 for other supplies)
- Basic Steps: I painted the suitcase white with indoor/outdoor latex paint. Then I cut out the old pocket on the upper part of the suitcase to have an even surface, and cut the new fabric to the right size of the suitcase (separate pieces: upper part, lower part, sides)
I folded the fabric one inch on the sides and ironed them to have a clean edge, and then glued the fabric onto the old fabric with Mod Podge. For better hold, I stapled the corners. You can also use plastic to line the suitcase instead of fabric. You can get custom cut plastic at Cut My Plastic. To hold the cutlery and champagne glasses, I took a piece of ribbon, stapled the beginning, made a loop big enough to hold a fork and knife/champagne glass and stapled again. To hold the plates, I stapled a square Velcro piece onto the suitcase and sewed the opposite piece onto a piece of ribbon (4x). I also made a little garland out of baker’s twine and felt and glued it to the top part of the suitcase.

I also designed picnic printables for his birthday, which you can download here. Most of the objects I found at the local Dollar Store. Get some Vintage paper straws from Amazon. I sewed a little bag out of the graham fabric and filled it with the cake mix (still wrapped in plastic).
The weather is still nice, hurry up and make your own and enjoy a romantic picnic with your loved one!
Hope I did well! I wish everyone a happy and creative week. And if you have time, stop by at Funkytime and like me on Facebook!
xoxo,
Sibylle


I have been looking for a picnic basket for a while now, i never thought to change it and give it my own look, thanks so much!
I LOVE this birthday suitcase! LOVE LOVE LOVE!!! Thank you for guest posting here!
WOW! This is adorable! so creative! Thank you for sharing.
We just HAPPEN to have an old suitcase in our basement! I knew we were keeping it around for something…. 🙂
What a CU-uuuuute idea! I am super excited for another birthday to roll around so I can actually DO this idea! I am heading off to check out this darling site! 🙂
I am in LOVE with this idea! I can’t believe it is the same suitcase! Such a great idea. Thanks for sharing.