
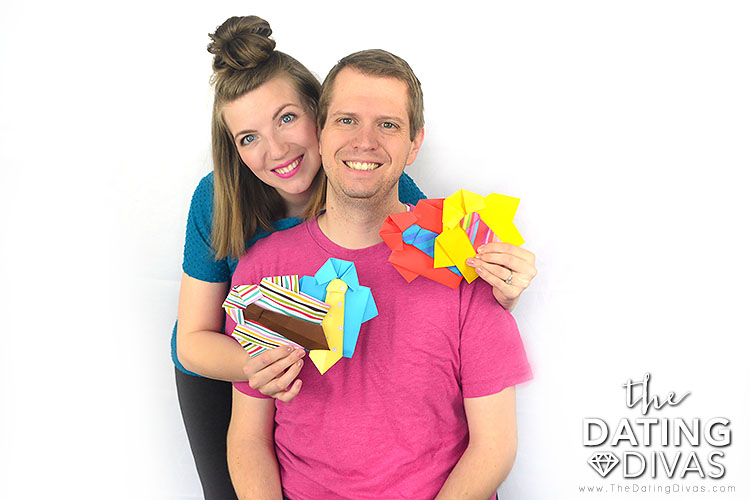
DIY Origami Shirt and Tie with How-to Instructions
We have laid out step-by-step how-to origami instructions for creating your own shirt and tie. This fun DIY origami shirt card idea is PERFECT for the man in your life. It can easily be given for a birthday, Father’s Day, or even just because! And, here’s the best part. It only requires 2 pieces of paper! No glue, no ribbon – just paper! Not only is this origami shirt idea easy, it’s also SUPER fun. So, that being said – it’s ORIGAMI time! Of note, this card can be a fun keepsake on its own, OR you can also open it up and add a sweet note inside. Additionally, this is also a fun activity for older kids who enjoy crafting or want to make something special! Scroll down to check out how to make a fun origami shirt and tie!
Materials Needed:
- One 8.5 x 11 piece of paper (shirt)
- One 5″ x 5″ piece of paper (tie)
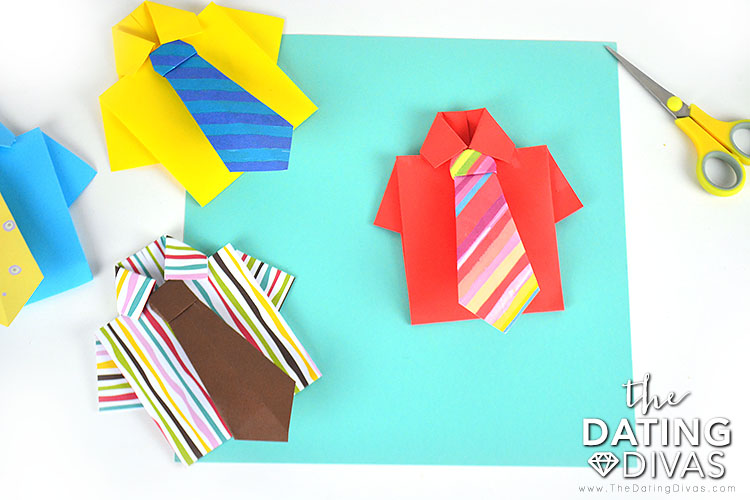
If you want a really unique origami shirt and tie, then we suggest mixing patterned paper with solid paper. The solid together with a pattern gives it a fun, realistic look. Now, on to the origami shirt tutorial!
How to Make an Origami Shirt
To teach you how to make an origami shirt and tie, we have step-by-step photos to guide you along. If you take it each step at a time, then you will unquestionably have a fantastic finished product! So, let’s begin with the paper shirt!
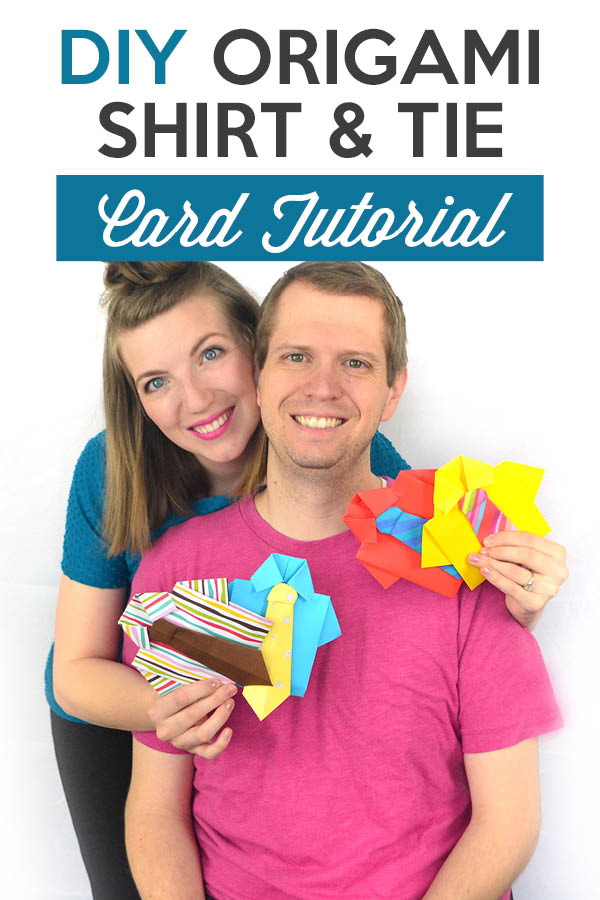
Step 1: Start with an 8.5 x 11 piece of paper and fold it in half lengthwise to create a center crease. Then, open it back up again and take one side of the paper to the center crease.
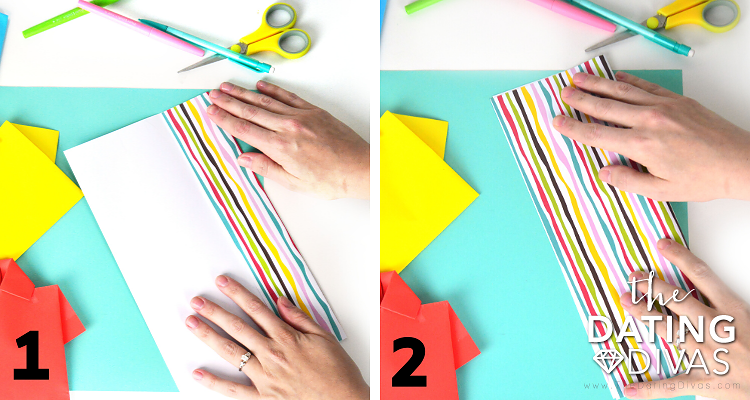
Step 2: Repeat with the other edge of the paper to create 2 flaps opening toward the center.
The next step is to…
Step 3: Take the upper inside edge of your first flap and fold it outward as shown in picture 3, creating a “V” shape. The angle should start at about a quarter of a way down the paper.
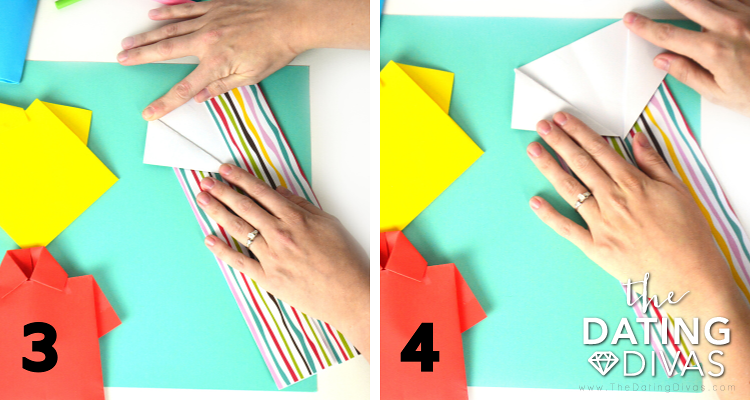
Step 4: Repeat with the other side. These will be the sleeves! Next, flip your paper upside down and over so that the angled flaps (or “V”) are now face down on the table and closest to you.
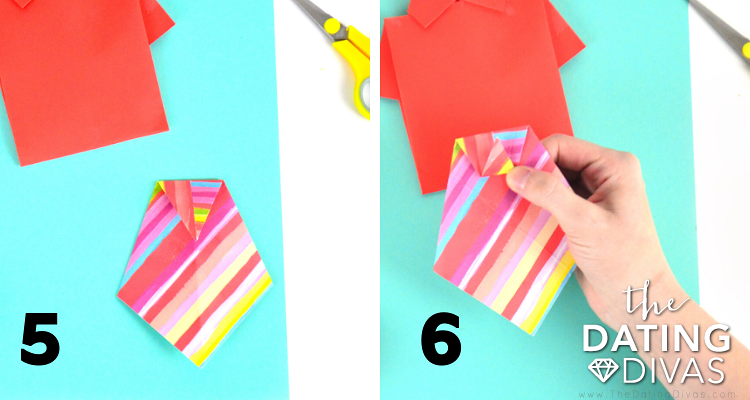
Step 5: Take the now top edge of the paper and fold it down about one inch. This is the first part of the collar.
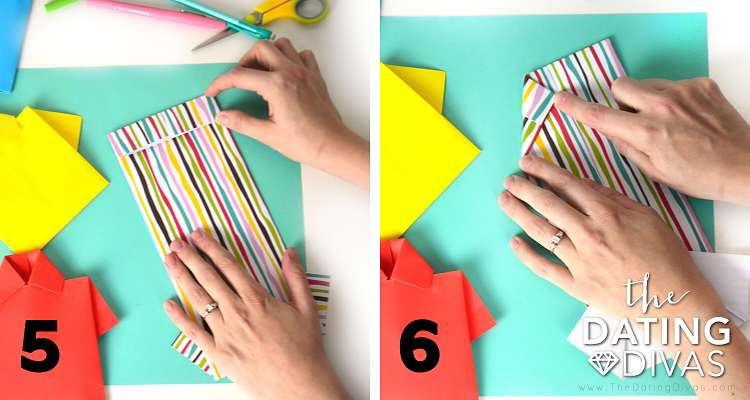
Step 6: Flip your project back over so that the “V” is now facing up (but keep the “V” part closest to your body.) Take the upper left and right corners and fold them in to meet in the center with the edges meeting at about ¼ inch from the top. You now have your paper shirt collar!
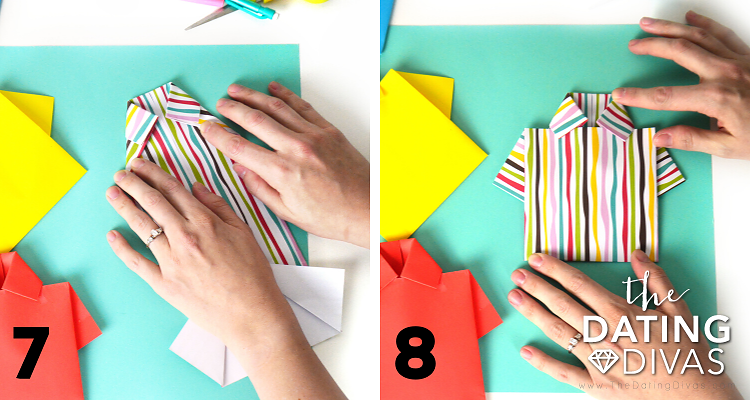
Step 7: You are almost there! This is what your project should look like so far. How are you doing?
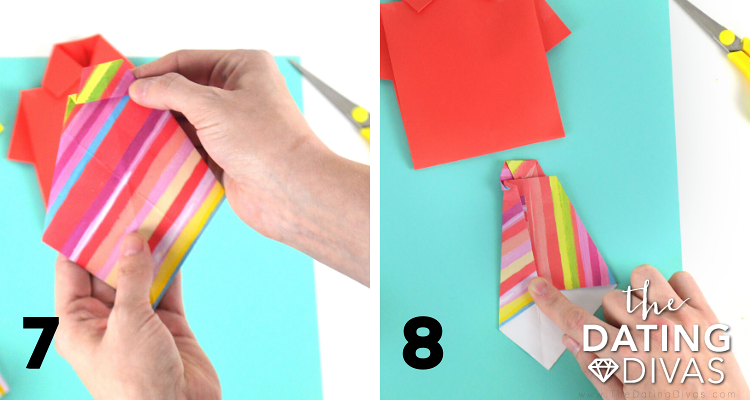
Step 8: Finally, with the “V” flaps closest to you, fold upwards that half of the paper and tuck it underneath the collar you just created. Crease appropriately and . . .
You now have your origami shirt!
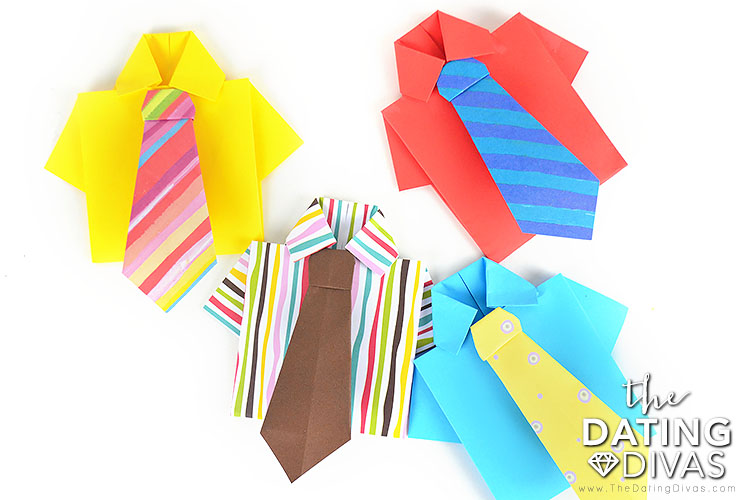
That wasn’t so bad, was it? Now, you can leave it like that and have an amazing card. OR, if you are up for some more folding, you can add a matching origami tie to the ensemble! Sounds fun right? Here we go, let’s finish our origami shirt and tie combo!
How to Make an Origami Paper Tie
For the record, the origami shirt itself is super fun, but the tie kind of kicks it up a notch, don’t you think? For this step, find a coordinating piece of paper, cut it to size, and then you are ready to go! Check out the steps for how to make an origami tie below!
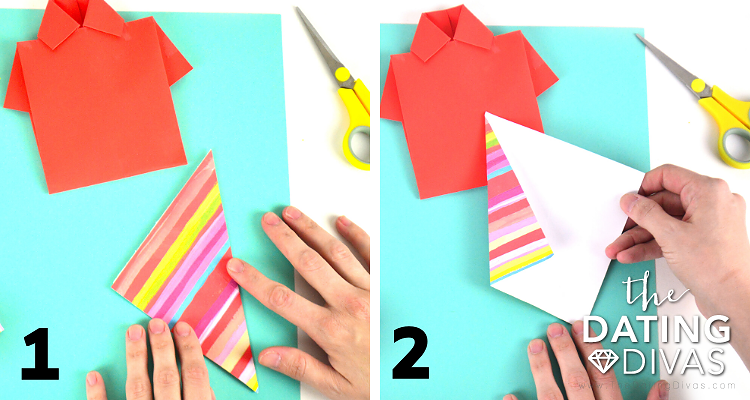
Step 1: Start with a 5″ x 5″ piece of paper. Take any two opposite corners and fold to create a triangle. Then, unfold. This will leave a diagonal crease down the center of your square.
Step 2: Take one outside corner and fold it in so that the edge matches up with the diagonal crease you just created.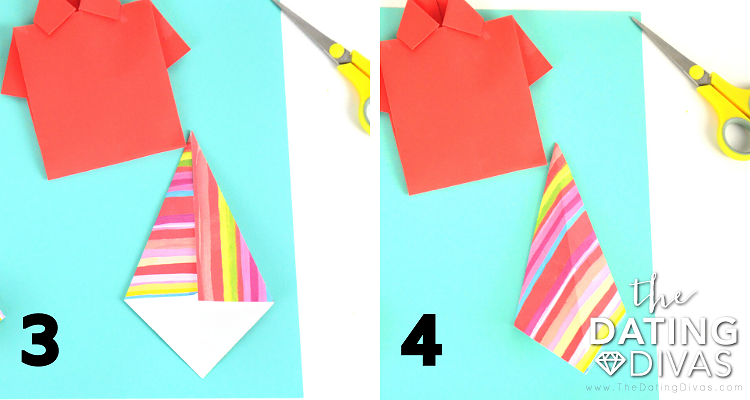
Step 3: Repeat step 2 with the other side of the tie.
After that…
Step 4: Flip it over. At this point, your project should look like picture 4.
Step 5: Take the top point and fold it towards you, almost halfway down.
Then…
Step 6: Take that point and fold it towards the top, stopping just short of the edge of the paper.
Step 7: One more fold on this side! Take that point AND the under flap and fold it upwards. This is the knot of the tie. (Confession: This is the trickiest section. However, just note how there is a little jog where the fold is and mimic that.)
Step 8: Final steps coming up for the tie! 😉 First, flip the project over. Next, take the outside of the paper and match its edge with the middle crease.
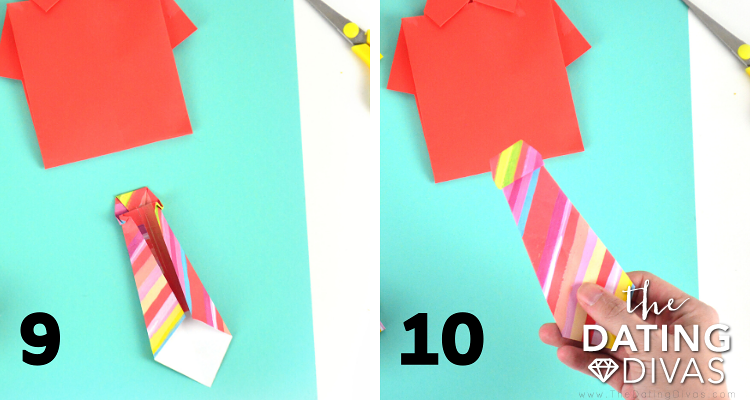
Step 9: Repeat with the other side. Of note, as you do this step, a little diamond will form. Just gently ease it into position and crease down gently to finalize your paper tie.
Step 10: You did it! Just slip the tie under the collar of your paper origami shirt and you are good to go! And congratulations! You just made an origami tie!
Gifting Your Origami Shirt
Well, your fantastic creation is now ready to gift! Personally, I love the thought of folding the origami, then pairing it with an actual shirt and tie for a special present. And, another option is that depending on your shirt size, the paper origami shirt and tie might even fit in the pocket! How cute would that be?

But, before you get to gifting, feel free to take this gift up a notch by writing a special note on the inside of the paper shirt. Simply write your personalized message on the inside of your paper prior to folder, OR untuck your finished origami shirt to write a note.
Guys! It is really that simple to make! Not only that, perhaps you can “tie” in the theme of the card with something like:
- “I hope this gift suits you!”
- “Happy Fathers Day! Now – let’s celebrate in our birthday suits” {wink!}
- “My favorite suit you wear is your birthday suit”
- “Suite up for a night of fun!”

Whatever you decide, the message will mean the most! Without a doubt, this card is unique, personal, and PERFECT for the man in your life!
Lastly, if you’re looking for additional gift ideas to accompany your AMAZING new origami shirt card, check out our quick and easy collection of Romantic Gifts for Him and Gift Guide for Him.
Enjoy!


These are SO cute! Perfect for Father’s Day!
i love the t shirt this should be the top ten creation
We are so happy you liked it! Thank you for your comment.
I put a note inside the shirt, hope my hubby likes it 😉 I loved this idea
This project was really fun! I made a lot of these for my dad to put in his office :).
I know this is kinda silly but can I just use an A4 for the shirt???
c;
I am sure that you can! It shouldn’t be a problem
Where can I find a printable stripe pattern like the one above?
Carmen – I got the paper I used from a scrapbooking paper packet. If you go to your nearest craft store, you will find hundreds of options! Good luck!
This is great! My son LOVES origami and he would love to make this. Thanks for sharing it at Monday Funday!
Awesome tutorial! Thanks for sharing at Whatever Goes Wednesday! We’ll be featuring this in a Father’s Day round-up over at Someday Crafts tomorrow 🙂
I remember making these when I was young but I’ve forgotten how. Thanks for the reminder. I’ll pin so I won’t forget again. Found you at Polkadots on Parade party. Thanks.
Super cute! Great idea for gift or table decor! Thanks for sharing. Come check out our Pattern Party starts the 1st of each month.
Get Your Crap Together
LOVE the cute paper you used! This turned out soooooo cute! Your step-by-step instructions are da bomb!! Good job!!! XOXO
Super cute idea- totally making this with my girls for Father’s Day! And thanks Michelle- I just might add a picture of his face to the top. 😉
My hubby made me one of these with a dollar bill a couple years ago for Christmas. He cropped a cute picture of his head and attached it to the shirt, then attached it to the end of his sweet letter. I thought it was such a cute idea! Now, thanks to you, I can learn how to do it myself! Thanks girl! xox
I LOVE that idea! That would be so fun!
This is the cutest thing ever! I’m so doing it for father’s day! Thanks Sarina!